
Use and Care of Microscopes -Microscopes are invaluable tools that allow us to explore the microscopic world and observe objects that are otherwise invisible to the naked eye. Whether you’re a student, scientist, or enthusiast, understanding how to properly use and care of microscopes is essential for obtaining accurate results and maintaining the instrument’s longevity. In this article, we will delve into the Use and Care of Microscopes, covering everything from their setup and maintenance to capturing images and troubleshooting common issues.
Introduction – Use and Care of Microscopes
Microscopes play a crucial role in various scientific disciplines, including biology, medicine, and materials science. They enable us to visualize the intricate details of cells, microorganisms, tissues, and other small structures. To make the most of this powerful instrument, it is essential to familiarize yourself with its different components and learn proper handling techniques.
Understanding the Microscope
Before diving into the specifics of microscope use and care, let’s briefly explore the types of microscopes and their main parts.
Types of Microscopes
There are several types of microscopes available, each suited for different applications. The most common types include:
- Optical Microscopes: These microscopes use visible light and lenses to magnify samples.
- Electron Microscopes: They use a beam of electrons instead of light to magnify samples, offering higher magnification and resolution.
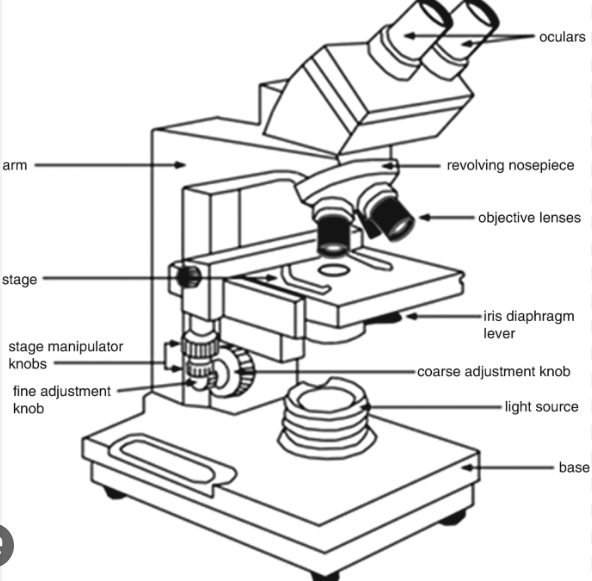
Parts of a Microscope
A typical optical microscope consists of the following components:
- Eyepiece or Ocular: The part you look through, usually magnifying the image by 10x.
- Objective Lenses: These lenses are located below the microscope’s head and provide varying levels of magnification.
- Stage: The platform where you place the slide or specimen.
- Illuminator: The light source, often located at the base of the microscope.
- Condenser: Located beneath the stage, it focuses the light onto the specimen.
- Diaphragm: Controls the amount of light passing through the condenser.
- Focus Adjustment Knobs: Used to bring the specimen into focus by adjusting the distance between the objective lens and the specimen.
- Coarse and Fine Adjustment Knobs: These knobs allow for precise focusing of the image.
- Arm: The curved part of the microscope that connects the head to the base.
- Base: The sturdy bottom of the microscope provides stability.
Setting Up and Handling the Microscope
To ensure optimal performance and longevity of your microscope, it’s important to follow proper setup and handling procedures.
Cleaning the Microscope
Before using the microscope, it’s essential to clean the lenses and other surfaces to remove any dust, fingerprints, or debris that may affect image quality. Use a soft, lint-free cloth or lens paper to gently wipe the lenses. Avoid using harsh chemicals or solvents that may damage the lens coatings.
Proper Storage
When not in use, store the microscope in a clean and dry environment, preferably in a dust-free case or cabinet. Protect it from excessive heat, humidity, and direct sunlight, as these factors can damage the optics and other sensitive components.
Handling with Care
Handle the microscope with care to avoid accidental damage. Always grasp the microscope by the arm and base, and avoid applying excessive force or pressure on the lenses or other delicate parts. When moving the microscope, hold it close to your body to ensure stability.
Microscope Maintenance
Regular maintenance is essential for keeping your microscope in optimal condition. Follow these guidelines to ensure its longevity and performance.
Regular Cleaning and Maintenance
Periodically clean the microscope using a soft brush or compressed air to remove dust and debris from the surfaces and crevices. Inspect the microscope for any loose screws or damaged components and tighten or repair them as necessary. Regularly check the electrical connections and cables for any signs of wear or damage.
Lens Care
The lenses are critical components of the microscope, and proper care is crucial for obtaining clear and accurate images. Clean the lenses using a lens cleaning solution and lens paper or a microfiber cloth. Gently wipe the lenses in a circular motion, starting from the center and moving outward. Avoid touching the lenses with your fingers to prevent oil and dirt transfer.
Light Source Care
If your microscope has a built-in light source, such as an LED or halogen lamp, ensure that it is functioning properly. Periodically check the light intensity and replace the bulb if it’s dim or flickering. Avoid leaving the light source on for extended periods when not in use, as it can cause overheating and reduce its lifespan.
Adjusting the Microscope
Proper adjustment of the microscope is essential for obtaining clear and focused images. Here are the key adjustments you need to consider.
Focusing the Microscope
To bring the specimen into focus, start with the lowest magnification objective lens and use the coarse focus adjustment knob to get a rough focus. Once the image is roughly in focus, use the fine focus adjustment knob for precise focusing. Repeat this process when switching to higher magnification objectives.
Adjusting Magnification
Microscopes often have multiple objective lenses with different magnification levels. To change the magnification, rotate the nosepiece (also known as the turret) to select the desired objective lens. Make sure to refocus the image after changing the magnification.
Sample Preparation
Before placing a sample on the microscope, it needs to be properly prepared to ensure clear visibility and accurate observation. Follow these steps for sample preparation.
Preparing Slides
- Clean the microscope slides to remove any dirt or residue.
- Place the specimen on the center of the slide.
- Add a drop of mounting medium or a suitable liquid (e.g., water, immersion oil) to the specimen.
- Carefully place a coverslip over the specimen, starting from one edge and gently lowering it to avoid trapping air bubbles.
Using Coverslips
Coverslips protect the specimen and ensure a flat surface for observation. Make sure the coverslip is clean and free from any smudges or debris before placing it on the specimen. Avoid pressing too hard to prevent damage to the slide or specimen.
Illumination Techniques
Microscopes employ different illumination techniques to enhance the contrast and visibility of the specimen. Here are some commonly used techniques:
Brightfield Illumination
This is the standard illumination technique where the specimen is illuminated from below. It is suitable for observing stained or naturally pigmented samples.
Darkfield Illumination
Darkfield illumination involves illuminating the specimen at an oblique angle, resulting in a dark background. It is useful for observing transparent or unstained specimens with low contrast.
Phase Contrast Illumination
Phase contrast microscopy is ideal for observing living cells and transparent specimens. It enhances the contrast by exploiting differences in refractive index within the specimen.
Fluorescence Illumination
Fluorescence microscopy uses fluorescent dyes or labels to visualize specific structures or molecules within the specimen. It requires a specialized microscope equipped with appropriate filters and a light source.
Capturing Images and Videos
Advancements in technology have made it possible to capture high-quality images and videos of the microscopic world. Here are some methods to consider:
Digital Imaging
Modern microscopes often come with built-in digital cameras or the ability to attach external cameras. These cameras capture the image directly into a computer or other digital devices, allowing for easy storage and analysis.
Camera Attachments
If your microscope doesn’t have a built-in camera, you can attach an external camera to the eyepiece using adapters. These cameras range from basic models to advanced ones equipped with specialized features for microscopy.
Image and Video Processing
After capturing the images or videos, you can enhance them using image processing software. Adjusting brightness, contrast, and sharpness can improve the quality and clarity of the visuals.
Best Practices for Microscope Use
To ensure accurate observations and reliable results, it’s important to follow these best practices when using a microscope:
Using Proper Lighting
Adjust the intensity of the light source to ensure optimal illumination without causing glare or overheating. The appropriate lighting conditions can enhance visibility and contrast.
Controlling Environmental Factors
Maintain a controlled environment when using the microscope. Factors such as temperature, humidity, and vibrations can affect the quality of observations. Keep the microscope in a stable and suitable environment to minimize these effects.
Avoiding Contamination
Prevent contamination of the microscope and your samples by practicing good laboratory hygiene. Clean the stage and other surfaces between samples, use clean tools, and avoid touching the lenses or other optical surfaces with bare hands.
Safety Precautions
When working with a microscope, it’s important to prioritize safety. Consider the following precautions:
Electrical Safety
Ensure that the microscope is properly grounded and that the electrical cords are in good condition. Avoid exposing the microscope to liquids or operating it with wet hands to prevent electrical shocks.
Chemical Safety
When using chemicals for staining or sample preparation, follow proper safety protocols. Use appropriate protective equipment, such as gloves and goggles, and work in a well-ventilated area to avoid inhaling hazardous fumes or coming into direct contact with harmful substances.
Eye and Skin Protection
Wear safety goggles to protect your eyes from potential splashes or spills. Additionally, if you’re working with chemicals, use gloves to protect your skin from contact with irritants or corrosive substances.
Troubleshooting Common Issues
Even with proper care and maintenance, microscopes can encounter issues that affect their performance. Here are some common problems and possible solutions:
Blurry Images
If your images appear blurry, check the focus adjustment and make sure the specimen is properly mounted. Clean the lenses to remove any smudges or dirt that may be causing distortion.
Uneven Illumination
Uneven illumination can result from improper alignment of the light source or issues with the condenser. Adjust the lighting settings and ensure the condenser is correctly positioned.
Stuck or Damaged Components
If any components of the microscope become stuck or damaged, avoid forcing them. Consult the microscope’s user manual or seek professional assistance to avoid causing further damage.
Conclusion-Use and Care of Microscopes
In Conclusion Use and Care of Microscopes – Mastering the use and care of microscopes is essential for obtaining accurate and reliable results in scientific research, education, and various other fields. By understanding the different types of microscopes, their parts, and following proper handling, maintenance, and troubleshooting procedures, you can ensure optimal performance and longevity of your microscope. Remember to follow safety protocols and best practices to protect yourself and your equipment.
FAQs-Use and Care of Microscopes
How do I clean the lenses of a microscope?
To clean the lenses of a microscope, use a soft, lint-free cloth or lens paper. Avoid touching the lenses with your fingers and gently wipe them in a circular motion, starting from the center and moving outward.
Can I use a microscope without preparing slides?
Yes, you can use a microscope without preparing slides by using a microscope slide with a coverslip or utilizing specialized slide holders. However, preparing slides allows for better sample stability and observation.
What is the difference between brightfield and darkfield illumination?
Brightfield illumination involves illuminating the specimen from below, providing a bright background. Darkfield illumination illuminates the specimen at an oblique angle, resulting in a dark background, which enhances contrast for transparent specimens.
What safety measures should I follow when using a microscope?
Follow electrical safety guidelines, wear protective gear such as goggles and gloves, and work in a well-ventilated area. Avoid exposing the microscope to liquids, chemicals, or excessive heat, and maintain good laboratory hygiene to prevent contamination
Robert Koch Postulates: The Foundation of Modern Microbiology